将树莓派打造成无线路由器
步骤
1 在电脑一端ssh登录树莓派
2 更新Raspbian wheezy系统,命令:
sudo apt-get update && sudo apt-get upgrade
3 安装必要的组件, 将树莓派打造成AP需要如下组件:
- rfkill: 一个无线网络工具
- zd1211-firmware: 一个常见的路由器固件,与很多USB无线网卡兼容
- hostapd: hostap守护程序
- hostap-utils 附加的hostap工具
- iw: 无线配置工具
- dnsmasq: DHCP和DNS工具
- bridge-utils: 用来桥接多个以太网设备
使用以下命令来安装以上组件:
sudo apt-get install rfkill zd1211-firmware hostapd hostap-utils iw dnsmasq bridge-utils
4 设置USB无线网卡
1) 验证树莓派可以识别USB无线网卡, 命令:
lsusb
2) 验证无线网卡支持AP模式, 命令:
iw list
如果这条命令的输出没有显示关于AP模式的信息,那么无线网卡就不支持AP模式
如果使用 rtl8188cus 芯片的无线网卡,那么可能会出现错误: nl80211 not found ,执行命令:
dmesg | grep rtl
若输出结果类似于以下
[ 6.240292] usbcore: registered new interface driver rtl8192cu
那么这无线网卡很可能支持AP模式
5 设置无线功能
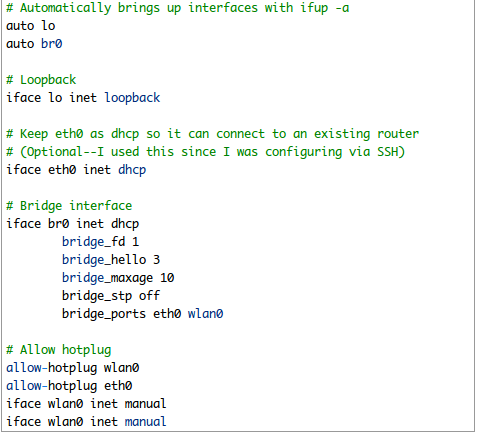
1) 备份/etc/network/interfaces文件,然后打开此文件
sudo cp /etc/network/interfaces /etc/network/interfaces.orig
sudo vi /etc/network/interfaces
2) 将文件内容更改成如下

3) 重启wlan0
ifdown wlan0
ifup wlan0
6 设置hostapd
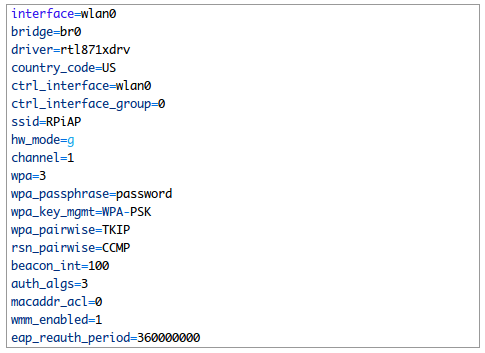
1) 备份/etc/hostapd/hostap.conf文件,然后打开此文件
sudo cp /etc/hostapd/hostap.conf /etc/hostapd/hostap.conf.orig
sudo vi /etc/hostapd/hostap.conf
2) 将文件修改成如下,适当调整country_code, ssid等。

3) 如果之前的iw list出错,那么也要备份/etc/default/hostapd(如果此文件存在的话)。
sudo cp /etc/default/hostapd /etc/default/hostapd.orig
sudo vi /etc/default/hostapd
在文件中找到DAEMON_CONF这一行,去年前面的#号,修改成如下:
DAEMON_CONF="/etc/hostapd/hostapd.conf"
4) 如果之前的iw list出错,那么需要安装另外一个版本的/usr/sbin/hostapd,点出此链接下载。
备份原来的/usr/sbin/hostapd
sudo cp /usr/sbin/hostapd /usr/sbin/hostapd.orig
删除原来的/usr/sbin/hostapd
cd /usr/sbin
sudo rm -f hostapd
sudo wget http://dl.dropbox.com/u/1663660/hostapd/hostapd ;
为新的/usr/sbin/hostapd设置文件权限
sudo chown root:root hostapd
sudo chmod 755 hostapd
重启hostapd以使设置生效。
sudo service networking restart
sudo service hostapd restart
如果hostapd重启失败,执行下面的命令看看问题出在哪里
sudo hostapd -d /etc/hostapd/hostap.conf
7 现在树莓派路由的SSID应该可以被扫描出来了。但在连接之前还需要进行一些设置,特别是dnsmasq的设置。
1)备份/etc/dnsmasq.conf文件,然后打开此文件
sudo cp /etc/dnsmasq.conf /etc/dnsmasq.conf.orig
sudo vi /etc/dnsmasq.conf
2) 找到以下三行,去掉前面的#符号,并添加相应的参数。

3) 重启dnsmasq服务以使修改生效
sudo service dnsmasq restart
8 启用IPv4端口映射,命令:
sudo echo 1 > /proc/sys/net/ipv4/ip_forward
如果上面的命令返回permission denied错误,那么执行下面的命令:
sudo sysctl -w net.ipv4.ip_forward=1
启用NAT
sudo iptables -t nat -A POSTROUTING -j MASQUERADE
在使用过程中发现,自己安装的hostapd守护程序需要手动启动,也就是执行下面的命令:
sudo hostapd -d /etc/hostapd/hostap.conf
若要在开机时自动启动hostapd守护程序,可以编辑/etc/rc.local文件,在exit 0 的上一行添加如下命令:
hostapd -d /etc/hostapd/hostap.conf &
完毕。


